La manicure a mezza luna ( half moon manicure o reverse french manicure) nasce negli anni 20 e rimane un must fino agli anni 40. A me piace tantissimo, la trovo davvero elegante pur essendo semplicissima, così ho pensato di proporvi un tutorial su come realizzarla passo per passo :)
Negli anni 20, non solo si lasciava libera la lunetta, ma anche la punta dell'unghia, in questo modo si manteneva lo smalto più a lungo, senza bisogno di ritocchi.
Dalla fine degli anni 30 in poi, si iniziò a colorare l'intera unghia lasciando la lunetta vuota, ed è propriamente questa la manicure a mezza luna, tanto amata dalla star del Burlesque, Dita Von Teese.
| Dita Von Teese |
La gamma dei colori più usata all'epoca era sui toni del rosso, del rosa, dell'arancione. Noi potremo sbizzarrirci con quelli che più ci piacciono, dal nero, al blu, al verde e così via.
Per la base- la nostra mezza luna- invece ci sono due possibilità: il colore neutro dell'unghia -trasparente oppure un colore più chiaro di quello che abbiamo scelto (bianco, perla, rosa carne etc.)Per questo tutorial però ho pensato di rimanere sul classico rosso, con una base trasparente. La manicure veniva fatta a mano libera, noi per comodità, velocità e per evitare di pasticciare useremo un piccolo trucchetto.
Ecco cosa abbiamo bisogno:
- smalto scuro
- smalto chiaro o trasparente
- salvabuchi
Io in questo tutorial sto usando:
 |
| 113 do you speak love? - Essence |
 |
| Lasting Color - smalto brillante - Pupa |
 |
| salvabuchi ;) INIZIAMO! |

1. Applichiamo la base trasparente sulle unghie e lasciamo ad asciugare qualche minuto. Successivamente tagliamo a metà i salvabuchi.

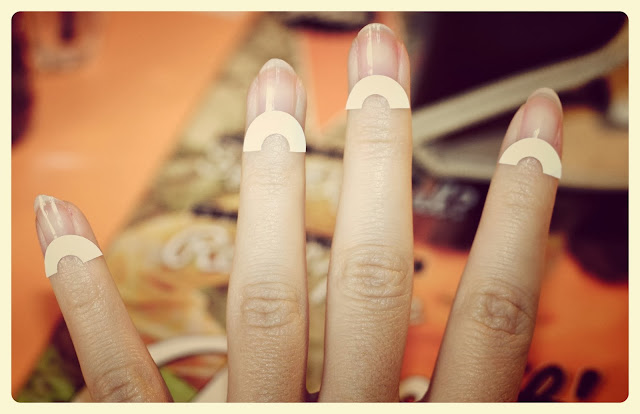
2.Applichiamo l'adesivo sull'unghia in modo da coprire la lunetta naturale ( possiamo scegliere se coprire un'area maggiore o minore a nostro piacimento).
Ecco a voi il risultato!
<3 Marla Von Duta
The half moon manicure (also known as reverse french manicure)
was invented in the 20s and remained a must until the 40s. I like it very much, I think it's very elegant despite being simple and essential, so I made this step-by step tutorial to show you how to make it!
During the 20s both the lunula (little moon) and the nail tip were kept without nail polish to make the nail polish last longer without touch-ups.
From the end of the 30s women began to color the whole nail keeping only the lunula empty: this is the real half moon manicure, beloved by the burlesque star Dita Von Teese.
The colours used at the time were mostly shades of red, pink, orange. We can go wild with any colour we like, from black to blue to green etc.
For the base (the half moon) there are 2 options: you can keep the natural colour of the nail, using a transparent base or you can use a lighter colour (white, pearl, pale pink)
For this tutorial I stayed on classic and picked a red on transparent base. This manicure was done free-hand, but to save time and avoid mistakes we'll use a little trick.
We need:
- dark nail polish
- light or transparent nail polish
- hole reinforcements
1. Apply the transparent base (or light colour) on your nails and let it dry. Then cut the hole reinforcements in half.
2. Apply the stickers on your nails, covering the natural little moons. You can choose to cover a bigger or smaller area.
you're done!
<3 Marla Von Duta


Nessun commento:
Posta un commento